A 3D model without reliable texture can feel unfinished even when the mesh is strong. The shape may be correct, but the surface tells the story. Wood needs grain. Metal needs the right response to light. Fabric needs readable weave and softness. Skin, hair, ceramic, stone, leather, and painted plastic each need different visual behavior. If the texture fails, the model fails in the viewer's eye.
Image-to-3D texture generation has its own set of problems. Colors can smear across seams. Shadows from the source photo can become baked into the texture. A highlight from the original lighting setup can look like a permanent white stain. The front of the object may look detailed while the back becomes vague. A texture may align poorly with the geometry, making grooves, edges, and material boundaries feel detached from the form.
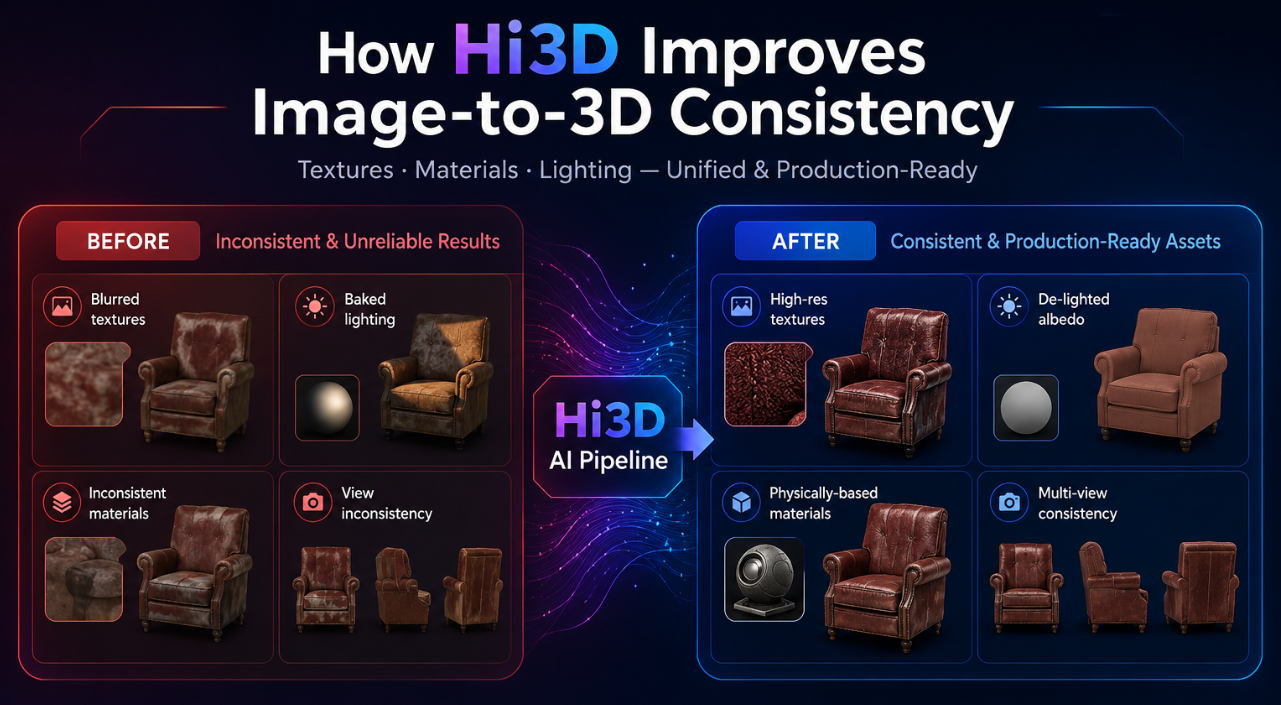
HI3D approaches texture as part of production, not decoration. Its official materials emphasize PBR textures, de-lighting, AI texturing, texture consistency, UV support, and workflows that can generate geometry and texture together or separately. The result is an image-to-3D workflow that pays attention not only to what the object is shaped like, but also to how it behaves when lit, rendered, printed, or inspected.
Why Texture Quality Is a Production Issue
Texture quality matters because most 3D assets are judged under changing conditions. A product model may appear in a web viewer, then in an AR preview, then in a render. A game prop may move from daylight to torchlight. A film prop may be tested under different shot lighting. A maker may use color or material information to plan a multi-color print. In all of those cases, texture must remain coherent beyond the first preview.
A weak texture pipeline creates predictable problems. Baked shadows fight new lighting. Cross-view inconsistency makes one side of the object look different from another. Misalignment makes surface details drift away from geometry. Missing texture coverage exposes blank or stretched areas. Overly flat color makes the asset look artificial, while over-baked lighting makes it impossible to relight.
This is why Hi3D's texture features matter. They are not only about making the model prettier. They are about making the surface easier to use in real workflows.
The Baked Lighting Problem
A source image carries the lighting of the moment it was captured. If a shoe is photographed under a strong lamp, the photo contains shadow, highlight, color cast, and reflected light. If those lighting artifacts are copied directly into the texture, they become part of the model. When the model is placed into a new scene, the old lighting remains stuck on the surface.
Hi3D directly addresses this issue on its homepage with a de-lighted texture example and the message "Remove The Lighting, Keep The Truth." The official description says Hi3D intelligently detects and removes baked-in lighting and shadows to generate clean textures that can be relit, re-rendered, and used in real production.
That is a major difference between a texture that only looks good in one screenshot and a texture that can survive a workflow. De-lighting gives the user a cleaner base. The model can then respond more naturally to the new lighting environment instead of carrying the visual memory of the original photo.
PBR Textures and Why They Matter
PBR stands for physically based rendering. A PBR workflow helps materials respond more consistently to light in modern rendering systems and game engines. It does not mean every generated material is physically perfect, but it gives creators a more useful material foundation than a flat color image.
That combination is important. Hi3D is not only generating a mesh with a color layer. It is helping users create textured models that can fit better into rendering, game, and film workflows where material response matters.
Texture Consistency Across the Object
One of the hardest parts of image-to-3D texture generation is consistency. The texture should not behave like a sticker placed on a shape. It should match the geometry. Edges should make visual sense. Materials should continue around the form. Hidden or partially visible regions should be completed in a plausible way.
For a marketing article, this should be phrased carefully. The paper provides technical background for the direction of the system. It does not mean every possible generated texture will be flawless. The accurate claim is that Hi3D's documented product and research direction both emphasize texture consistency, alignment, and completeness as central problems.
AI Texturing as a Separate Creative Step
Sometimes the mesh is already good, but the surface needs work. The material may need to look more realistic, more stylized, cleaner, or more consistent with a creative direction. Hi3D's homepage includes AI Texturing as a feature that applies high-resolution 4K, PBR-ready textures to generated or uploaded 3D models.
This matters because image-to-3D does not always need to be a single locked step. A user may generate a geometry base first, inspect it, and then texture it. Another user may upload an existing model and use AI texturing to improve the surface. A designer may use texture generation to create a stronger visual presentation from a model that already has acceptable structure.
AI Texturing expands Hi3D from pure image-to-3D generation into a surface-quality workflow. It gives creators a way to keep working on the look of the model after the mesh exists.
All-in-One and Staged Texture Workflows
Hi3D officially supports different generation types. The API introduction lists geometry-only, staged generation, and all-in-one generation for image and multi-view to 3D. Geometry-only focuses on mesh structure. Staged generation separates geometry and texture. All-in-one generation creates geometry and texture together.
For texture-focused work, that flexibility is useful. All-in-one generation is fast when the user wants a complete visual model quickly. Staged generation is useful when the user wants to inspect or provide geometry first, then generate texture as a separate step. Geometry-only remains useful when the surface will be painted, printed in a single color, or handled in another tool.
UV Unwrap and Texture Editing
Texture quality also depends on whether the texture can be applied and edited properly. Hi3D's v2.1 update includes UV Unwrap, described as generating UV maps so textures can be applied correctly. The same update notes that without UVs, manual texture editing may be difficult.
This is a practical production detail. A model may look fine in a generated preview, but if an artist wants to modify the texture, adjust details, paint over areas, or move the asset into a DCC workflow, UVs become important. UV unwrap helps create a path from generated model to editable textured asset.
Texture Model Switching: Vertex Colors and Texture-Based Coloring
Hi3D's v2.1 update also includes texture model switching, allowing users to choose between vertex colors and texture-based coloring. The update notes that vertex colors can be more suitable for certain 3D printing workflows.
This is another place where texture quality intersects with output intent. A model for visual rendering may benefit from texture maps and PBR materials. A model for certain color printing workflows may benefit from vertex colors. A web preview may have different constraints from a high-end render. Hi3D gives users a way to choose a texture representation that better fits the next step.
Reduce Shading Intensity for Cleaner Inputs
The v2.1 update describes a Reduce Shading Intensity control that adjusts how strongly shadows and lighting are removed from the image. It notes that makers often prefer cleaner lighting, while keeping lighting may suit visual or game assets.
That is a subtle but important control. Removing all lighting can make a texture cleaner for relighting or printing. Keeping some lighting can preserve the visual character of the source image for certain artistic assets. Different users need different levels of de-lighting.
This feature also reveals a broader truth about AI texture generation: the best output is not always the most neutral one. Sometimes the user wants a clean material base. Sometimes the user wants the mood of the original image. Hi3D's shading control gives users a way to make that decision instead of accepting a fixed default.
Multi-Color and Physical Surface Workflows
Hi3D's homepage describes integrated multi-color segmentation and relief tools for efficient production. It also describes 3D relief generation from images with smooth depth transitions and refined dimensional detail, especially for printing and physical creations.
As with watertightness, this should be described with care. Multi-color segmentation can support certain color and production workflows. It should not be written as a guarantee that every generated model is instantly ready for every printer, material system, or color process. Users still need to inspect the model and prepare it for their specific hardware and software.
How Texture Quality Helps Game, Film, and Design Workflows
Game and film teams care about texture because assets are constantly relit. A prop may be previewed under neutral light, then tested inside a night scene, then rendered in a cinematic shot. If the texture contains baked shadows or inconsistent material regions, the asset becomes harder to evaluate.
Hi3D's PBR option, de-lighting, UV support, and AI texturing features are useful because they make generated models more adaptable. A team can create a visual prototype, export it, test it under scene lighting, and decide whether the design direction is worth further production work. The generated asset may still need cleanup, optimization, retopology, or manual material authoring before final use. But it can help the team make visual decisions earlier.
How to Evaluate a Hi3D Texture
After generation, inspect the texture from every angle. Look for baked shadows that should not be permanent. Check whether material details align with the geometry. Rotate the model under different lighting if possible. Examine the back, underside, and hidden areas. Look at edges, grooves, small features, and transitions between material regions.
This evaluation stage is not extra bureaucracy. It is how creators make AI-generated assets reliable. Hi3D accelerates texture creation, but the creator still decides whether the surface is ready for the job.
A Practical Hi3D Texture Workflow
Start with a clear image and decide what kind of surface you need. If the model is for visual review, all-in-one generation may be enough to create a quick textured asset. If the model needs structural inspection first, generate geometry before texture. If you already have a model, use AI Texturing to apply a high-resolution PBR-ready surface.
Export the model in the format that fits the next step. GLB can be useful for web previews. FBX and OBJ can support DCC and game workflows. STL and OBJ may fit physical preparation workflows. USDZ can support AR-oriented review. Then test the model under the conditions where it will actually be used.
The Right Claim: Texture That Can Keep Working
The safest way to describe Hi3D's texture strength is not to say that every generated material will be perfect. The better claim is that Hi3D gives creators a stronger texture workflow, supported by official features such as PBR textures, AI Texturing, de-lighting, Reduce Shading Intensity, UV Unwrap, texture model switching, and all-in-one or staged generation.
That combination helps solve the real texture problems in image-to-3D: baked lighting, weak material response, poor editability, inconsistent coverage, and surfaces that cannot adapt to a new context. Hi3D does not take creative judgment away from the user. It gives the user a cleaner, more flexible surface to judge.
A mesh gives the object its body. Texture gives it its presence. Hi3D is valuable because it treats both as part of the same production path. When the lighting changes, when the asset moves to a new tool, when the model is inspected from the back, or when the surface needs another pass, that attention to texture quality starts to matter.


